
The Honda Shuttle Wiring Diagram You’ll Ever Need: A Comprehensive Guide
The Honda Shuttle, a versatile and popular station wagon, has served families and adventurers alike for decades. Owning one often means tackling maintenance and repairs yourself, and a crucial tool in that endeavor is a reliable wiring diagram. This article provides a comprehensive guide to understanding and utilizing Honda Shuttle wiring diagrams, ensuring you can confidently diagnose and fix electrical issues in your vehicle. Whether you’re a seasoned mechanic or a DIY enthusiast, this guide will equip you with the knowledge you need.
Why You Need a Honda Shuttle Wiring Diagram
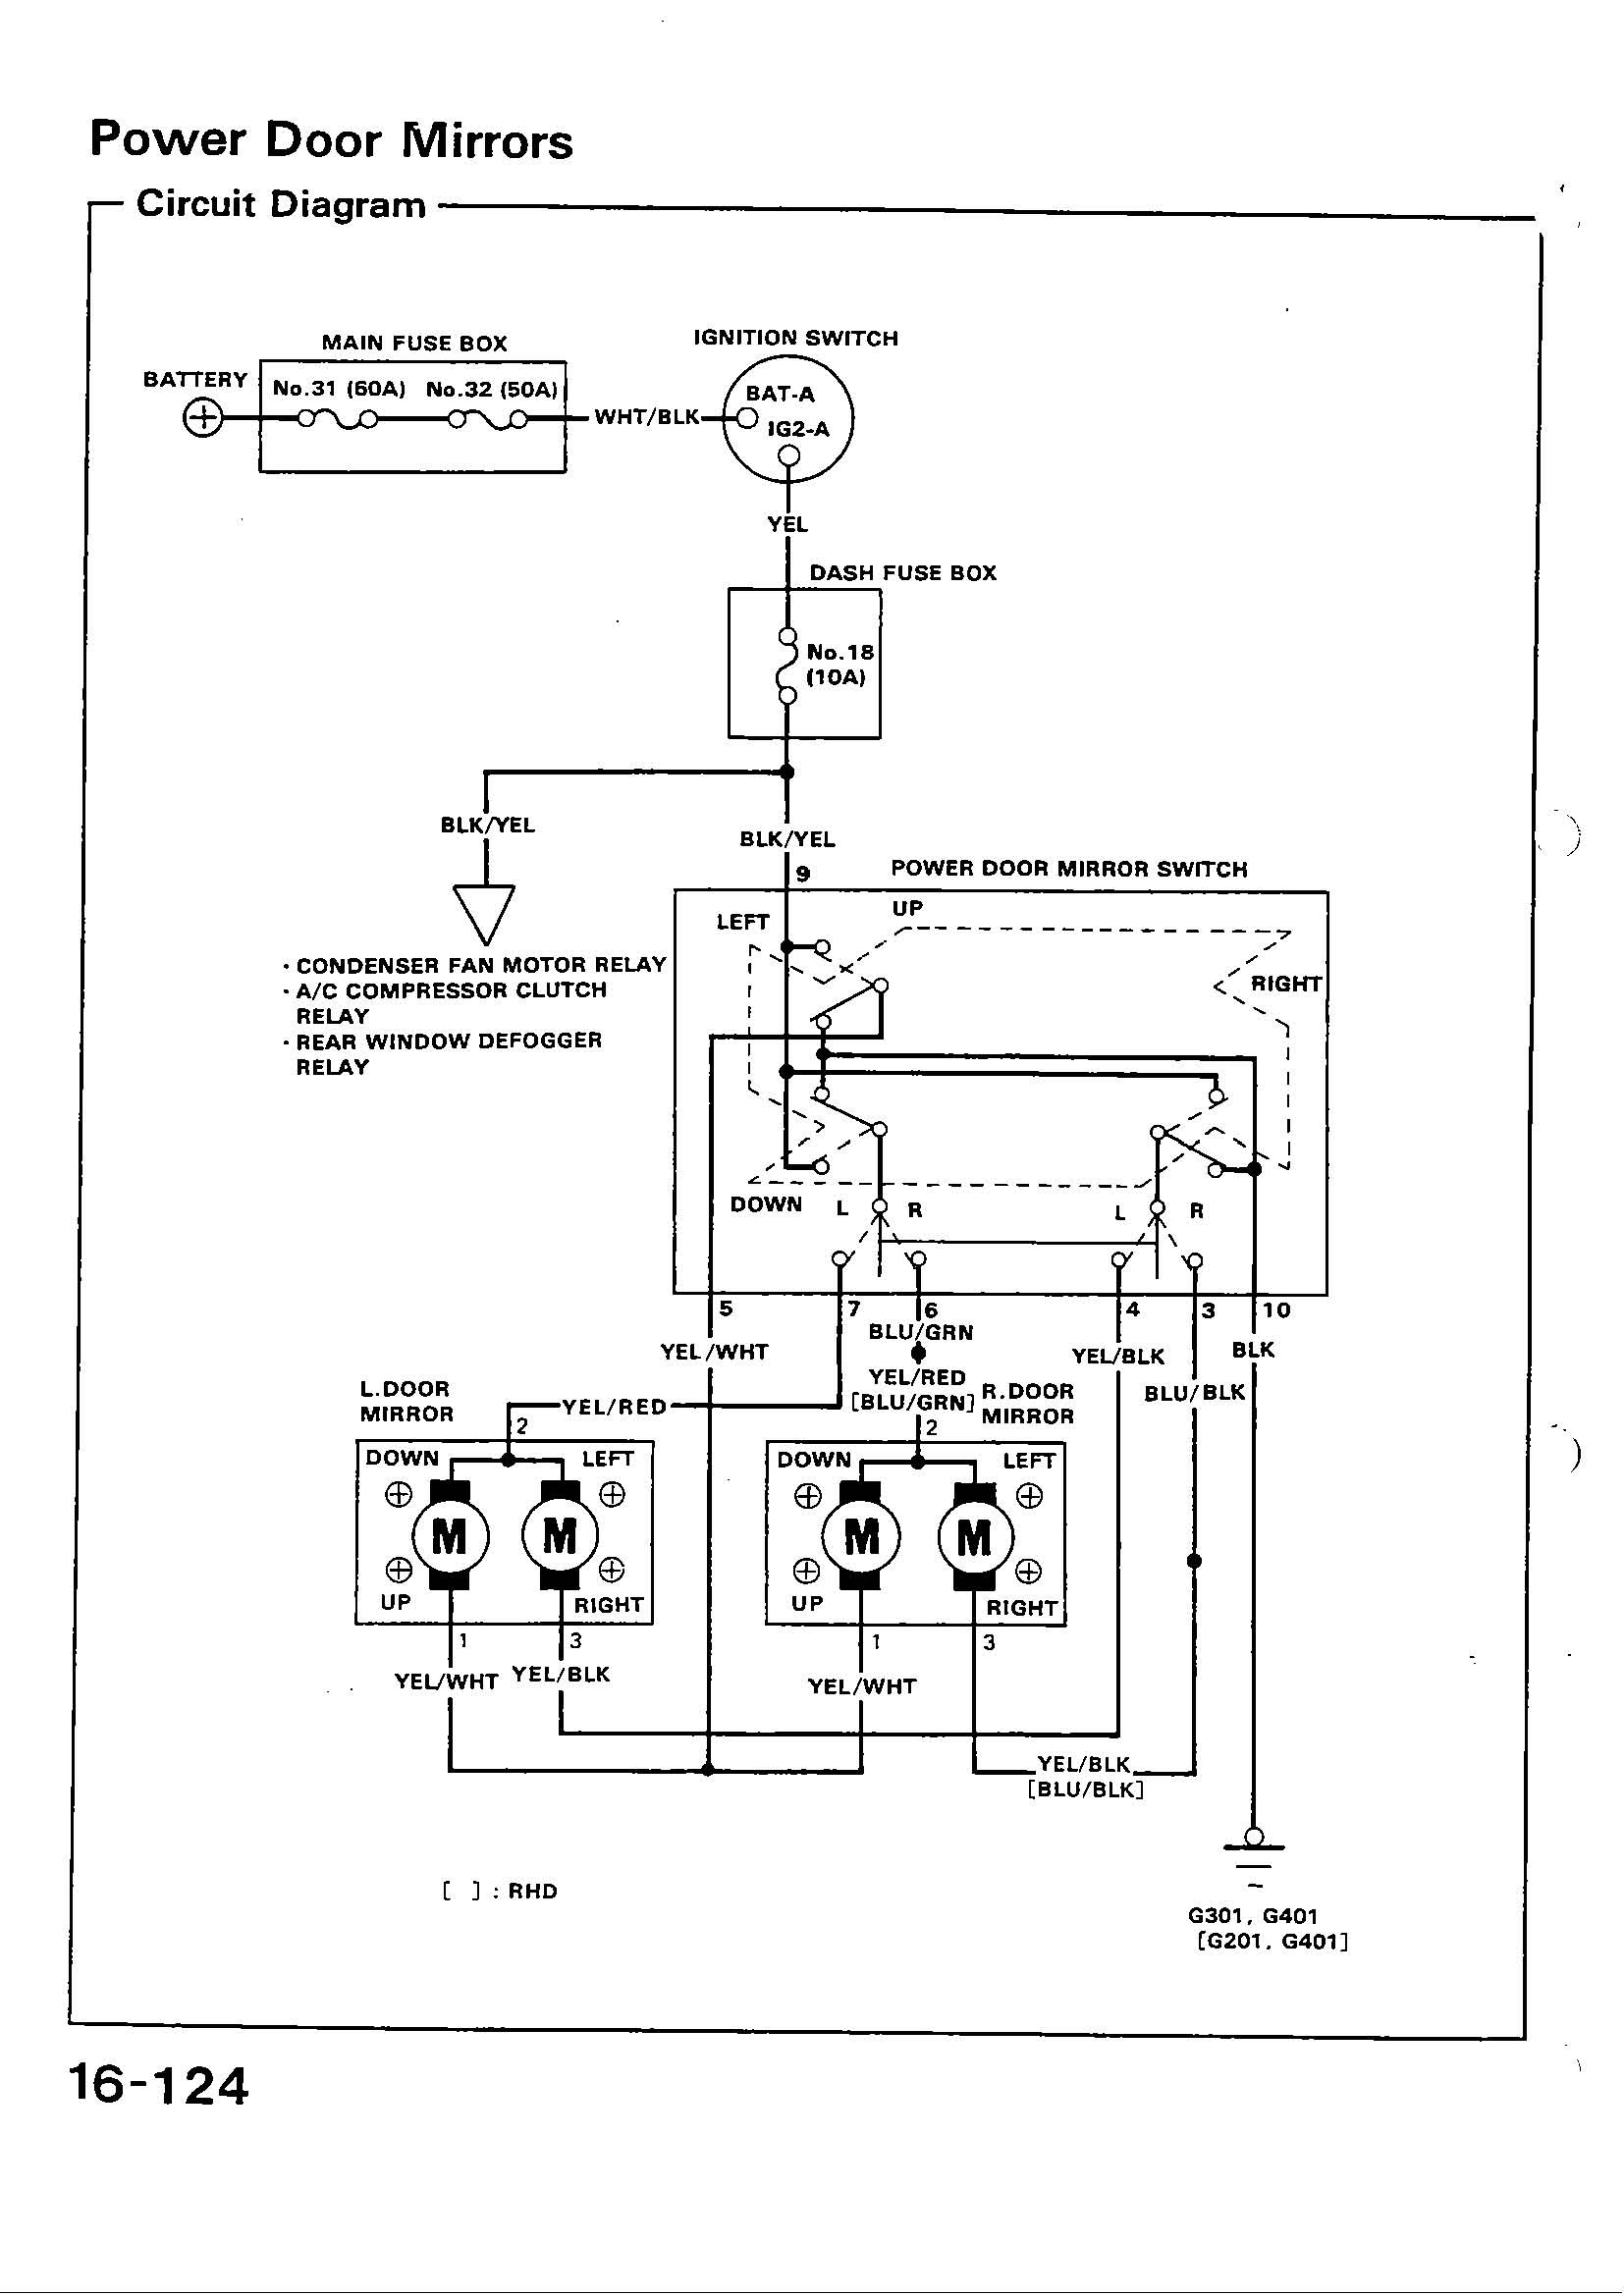
Electrical systems are the lifeblood of modern vehicles. From the headlights and taillights to the engine management system and infotainment, everything relies on a complex network of wires, connectors, and components. Without a wiring diagram, diagnosing electrical problems can quickly become a frustrating and time-consuming guessing game.
A well-structured wiring diagram provides you with:
- Component Identification: Clearly labels each electrical component, making it easy to locate and identify them within your vehicle.
- Wire Color Coding: Shows the color of each wire, crucial for tracing circuits and identifying connections.
- Circuit Tracing: Allows you to follow the path of electricity from the power source to the component, helping you pinpoint shorts, opens, and other faults.
- Connector Pinouts: Provides information on the pin assignments within connectors, essential for testing and troubleshooting.
- Fuse and Relay Locations: Indicates the location and function of fuses and relays, simplifying the process of checking for blown fuses or malfunctioning relays.
Finding the Right Honda Shuttle Wiring Diagram for Your Vehicle
The key to successful troubleshooting is using the correct wiring diagram for your specific Honda Shuttle model year and trim. Different model years often have subtle but significant changes in their electrical systems.
Here’s how to find the right one:
- Identify Your Model Year: The most crucial piece of information. Locate the year on your vehicle’s registration, VIN plate, or owner’s manual.
- Determine Your Trim Level: Different trims may have different features and therefore, different wiring diagrams.
- Consult Your Owner’s Manual: Some owner’s manuals include basic wiring diagrams or refer you to more comprehensive sources.
- Online Resources:
- Subscription Services: Websites like AllDataDIY and Mitchell1 offer comprehensive wiring diagrams, repair manuals, and diagnostic information for a monthly or annual fee. These are generally the most accurate and detailed.
- Free Online Forums and Websites: Many online forums and enthusiast websites dedicated to Honda vehicles may provide free wiring diagrams. Be cautious and verify the diagram’s accuracy before using it.
- Specific Wiring Diagram Downloads: Search online using specific keywords like “Honda Shuttle [Year] wiring diagram PDF” or “Honda Shuttle [Year] electrical schematic.”
- Haynes or Chilton Repair Manuals: These manuals often include wiring diagrams and are a valuable resource for general repair and maintenance.
- Local Library: Your local library may have repair manuals or access to online databases that include wiring diagrams.
Understanding the Components of a Honda Shuttle Wiring Diagram
Wiring diagrams can seem daunting at first, but understanding their components will make them much easier to navigate.
- Symbols: Standard symbols are used to represent various components, such as:
- Resistors: Zigzag lines
- Capacitors: Two parallel lines
- Diodes: Triangle pointing to a line
- Switches: Represented by a switch symbol
- Connectors: Boxes with labeled pins
- Ground: Often represented by a series of horizontal lines.
- Wire Color Codes: Wires are color-coded to quickly identify their function and circuit. Common color codes include:
- B: Black
- R: Red
- W: White
- G: Green
- Y: Yellow
- Bl: Blue
- Br: Brown
- Fuses and Relays: The diagram will show the location and function of fuses and relays within the electrical system.
- Ground Points: Locations where circuits connect to the vehicle’s chassis or ground.
- Circuit Identification: Each circuit will be clearly labeled with a name or number to help you identify its function.
Troubleshooting Electrical Problems Using a Wiring Diagram
Using a wiring diagram to diagnose electrical problems is a methodical process:
- Identify the Problem: Describe the issue as specifically as possible (e.g., “Headlights don’t work,” “Engine won’t start”).
- Consult the Diagram: Locate the relevant circuit in the wiring diagram (e.g., headlight circuit, starting circuit).
- Trace the Circuit: Follow the wiring from the power source (battery or fuse) to the affected component.
- Check Fuses and Relays: Verify that the fuses and relays in the circuit are functioning correctly.
- Inspect Wiring and Connections: Look for broken wires, corroded connectors, or loose connections.
- Test Components: Use a multimeter to test components for continuity, voltage, and resistance.
- Repair or Replace: Once you’ve identified the faulty component or wiring issue, repair or replace it accordingly.
Safety Precautions When Working with Electrical Systems
Working with electrical systems can be dangerous. Always take the following safety precautions:
- Disconnect the Battery: Disconnect the negative (-) terminal of the battery before working on any electrical components.
- Use Proper Tools: Use insulated tools to avoid short circuits and electrical shock.
- Avoid Working in Wet Conditions: Never work on electrical systems in wet conditions.
- Wear Safety Glasses: Protect your eyes from potential hazards.
- Consult a Professional: If you’re unsure about any aspect of the repair, consult a qualified mechanic.
Conclusion: Empowering Your Honda Shuttle Maintenance
A Honda Shuttle wiring diagram is an invaluable resource for any owner who wants to perform their own repairs or understand their vehicle’s electrical system. By following the guidance in this article, you can find the right diagram, understand its components, and confidently troubleshoot electrical problems. Armed with this knowledge, you’ll be well-equipped to keep your Honda Shuttle running smoothly for years to come.
Frequently Asked Questions (FAQs)
Where can I find a free Honda Shuttle wiring diagram? While finding a reliable free diagram can be challenging, try searching enthusiast forums and websites. However, always verify the diagram’s accuracy by comparing it with your vehicle’s actual wiring or consulting a paid resource for confirmation.
What is the best source for a detailed and accurate Honda Shuttle wiring diagram? Subscription-based online services like AllDataDIY or Mitchell1 offer comprehensive and up-to-date wiring diagrams and repair information.
What tools do I need to use a wiring diagram effectively? You’ll need a multimeter to test circuits for voltage, continuity, and resistance. A basic set of hand tools, including screwdrivers, pliers, and wire strippers, is also essential. Additionally, a good set of insulated tools is highly recommended.
How can I tell if a wire is broken without visually inspecting it? Use a multimeter set to continuity. Disconnect the wire from both ends, and touch the multimeter probes to each end of the wire. If the multimeter beeps or shows a low resistance value, the wire is good. If it shows “OL” (open line) or infinite resistance, the wire is broken.
Are all Honda Shuttle wiring diagrams the same? No. Wiring diagrams vary significantly based on the model year, trim level, and optional features of your Honda Shuttle. Always use the diagram specifically for your vehicle’s configuration.
