


The DiMarzio Super Distortion Wiring Diagram You’ll Ever Need: A Comprehensive Guide
The DiMarzio Super Distortion is a legendary pickup, renowned for its high output, thick tone, and aggressive character. It’s a staple in rock, metal, and countless other genres, capable of driving amplifiers into glorious overdrive and providing a powerful sonic foundation. If you’re planning to install or troubleshoot a Super Distortion, understanding the wiring is crucial. This article provides a comprehensive guide to the DiMarzio Super Distortion wiring diagram, covering various configurations and ensuring you have all the information you need for a successful installation.
Understanding the DiMarzio Super Distortion
Before diving into the wiring, it’s essential to understand the pickup itself. The Super Distortion is a humbucker, meaning it consists of two coils wired together to cancel out hum and noise. This design contributes to its powerful output and focused sound. Key features to remember:
- Four Conductors + Shield: The Super Distortion typically features four wires (plus a bare ground wire), offering flexibility in wiring options.
- High Output: This pickup is designed for high-gain applications, providing plenty of signal to your amplifier.
- Versatile Tone: While known for its aggressive sound, the Super Distortion can also produce clear, articulate tones depending on the wiring and guitar setup.
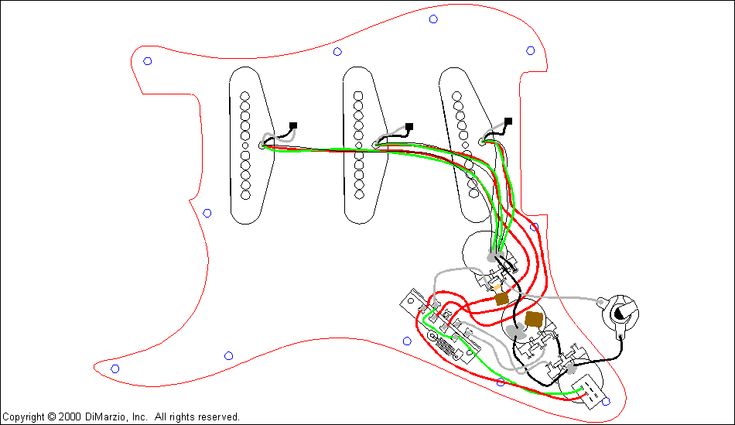
The Standard DiMarzio Super Distortion Wiring Diagram (Two-Conductor Output)
The most common wiring setup utilizes a two-conductor output. This is the simplest configuration and is ideal if you want a straightforward, powerful sound.
- Red Wire: Hot (Signal)
- Black & White Wires (Twisted Together and Taped Off): Typically twisted together and taped off. These wires are used for coil splitting, which is not used in this configuration.
- Green Wire: Ground (Connect to the back of a pot or a ground point in the guitar)
- Bare Wire (Shield): Ground (Connect to the back of a pot or a ground point in the guitar)
Wiring Procedure:
- Identify the Wires: Carefully identify each wire coming from the pickup. The colors are consistent across most DiMarzio pickups.
- Connect the Hot Wire (Red): Solder the red wire to the “hot” lug on your volume pot or the appropriate lug on your pickup selector switch.
- Connect the Ground Wires (Green and Bare): Solder the green wire and the bare wire to the back of a pot (usually the volume pot) or a grounding point in your guitar’s control cavity. Ensure a solid connection to minimize noise.
- Isolate the Coil Split Wires (Black & White): Twist the black and white wires together and insulate them with electrical tape or heat shrink tubing. These wires are not used in this standard configuration.
DiMarzio Super Distortion Wiring Diagram with Coil Splitting
Coil splitting allows you to switch between the full humbucker sound and a single-coil sound, offering greater tonal versatility. This configuration requires a switch (push-pull pot, mini-toggle, etc.) to activate the coil split.
Wiring Procedure:
- Identify the Wires: As before, identify the red, green, black, white, and bare wires.
- Connect the Hot Wire (Red): Solder the red wire to the “hot” lug on your volume pot or the appropriate lug on your pickup selector switch.
- Connect the Ground Wire (Green and Bare): Solder the green wire and the bare wire to the back of a pot or a grounding point.
- Coil Split Wiring:
- Connect the Black and White wires to the switch (push-pull pot or mini-toggle). The specific connection points on the switch will vary depending on the type.
- When the switch is activated, it will connect the black and white wires to ground, effectively disabling one of the coils and creating a single-coil sound.
- Consult the wiring diagram for your specific switch for detailed connections. DiMarzio often provides diagrams for coil-splitting setups on their website.
DiMarzio Super Distortion Wiring for Series/Parallel
Series/Parallel wiring alters the way the coils interact, affecting the output and tone. Series wiring provides a hotter, thicker sound, while parallel wiring results in a brighter, clearer tone with a slightly lower output.
Wiring Procedure:
- Identify the Wires: As before, identify the red, green, black, white, and bare wires.
- Connect the Hot Wire (Red): Solder the red wire to the “hot” lug on your volume pot or the appropriate lug on your pickup selector switch.
- Connect the Ground Wire (Green and Bare): Solder the green wire and the bare wire to the back of a pot or a grounding point.
- Series/Parallel Switch:
- This wiring requires a switch (push-pull, mini-toggle, etc.) to select between series and parallel modes.
- Consult the wiring diagram for your specific switch for detailed connections. Series/parallel diagrams vary depending on the switch type.
Troubleshooting Common Issues
Even with the correct wiring, problems can arise. Here are some common issues and their solutions:
- No Sound:
- Check Connections: Ensure all wires are securely soldered and that the connections are correct according to the chosen wiring diagram.
- Test the Pickup: Use a multimeter to check the pickup’s resistance. This will help determine if the pickup itself is faulty.
- Check the Guitar’s Electronics: Examine the volume and tone pots, switch, and output jack for any issues.
- Weak Sound:
- Wiring Errors: Double-check the wiring, paying close attention to the ground and hot connections.
- Improper Soldering: Cold solder joints can weaken the signal. Re-solder any connections that appear questionable.
- Hum or Noise:
- Grounding Issues: Ensure all ground wires are connected securely. Check for a continuous ground path throughout the guitar.
- Shielding: Shield the control cavity and pickup cavities with copper tape or conductive paint to reduce noise.
- External Interference: Move away from sources of electrical interference, such as fluorescent lights or computers.
Conclusion
Wiring a DiMarzio Super Distortion doesn’t have to be daunting. By understanding the pickup’s components, consulting the appropriate wiring diagram, and following the steps carefully, you can successfully install or troubleshoot this iconic pickup. Whether you’re aiming for a straightforward installation or exploring coil splitting or series/parallel options, this guide provides the foundation you need. Remember to double-check all connections, practice good soldering techniques, and enjoy the powerful, versatile tone of your Super Distortion!
Frequently Asked Questions (FAQs)
1. What is the difference between the two-conductor and four-conductor wiring?
The two-conductor wiring is the simplest, offering a standard humbucker sound. The four-conductor (plus shield) wiring provides more flexibility, allowing for coil splitting and series/parallel options, which offer a wider range of tonal possibilities.
2. Can I use a standard guitar wiring diagram for the Super Distortion?
Yes, but you must adapt it to the specific wiring configuration you’re aiming for. The key is to understand the function of each wire coming from the Super Distortion and connect them correctly to your guitar’s electronics.
3. My Super Distortion sounds thin. What could be the problem?
Thin sound can be caused by a few factors, including incorrect wiring (especially the hot and ground connections), a faulty pot, or a problem with your guitar’s electronics. Double-check all connections and test your guitar’s components. Also, if you are using coil splitting, confirm that the switch is properly configured.
4. Where can I find a specific wiring diagram for my guitar model?
DiMarzio’s website is a great resource, as they often provide wiring diagrams for their pickups, including the Super Distortion, with various guitar configurations. Also, searching online forums or communities dedicated to guitar building and modifications can provide wiring diagrams and helpful information for specific guitar models.
5. What tools do I need for wiring a Super Distortion?
You’ll need a soldering iron, solder, wire strippers/cutters, a screwdriver, electrical tape or heat shrink tubing, a multimeter (for troubleshooting), and possibly a small drill or reamer for enlarging holes.
