


The Boat Ignition Switch Wiring Diagram You Need: Troubleshooting and Installation Guide
Boating is a fantastic pastime, offering freedom and adventure on the water. However, a dead engine can quickly ruin a day on the waves. One of the most common culprits behind engine failure? A faulty ignition switch or incorrect wiring. This article provides a comprehensive guide to understanding boat ignition switch wiring diagrams, helping you diagnose problems, troubleshoot issues, and confidently install or repair your boat’s ignition system. We’ll cover everything from basic components to more complex wiring configurations, ensuring you can get back on the water safely and efficiently.
Understanding the Role of the Boat Ignition Switch
The boat ignition switch is the central control point for your engine’s electrical system. It acts as a master switch, distributing power to various components, including:
- Starter Motor: Engages to crank the engine.
- Ignition Coil: Provides the spark that ignites the fuel-air mixture.
- Fuel Pump: Supplies fuel to the engine.
- Engine Control Unit (ECU) / Electronic Control Module (ECM): Monitors and controls engine performance (in modern engines).
- Accessories: Lights, gauges, and other onboard electronics.
A properly functioning ignition switch is crucial for a smooth start and reliable engine operation. Incorrect wiring or a faulty switch can lead to a no-start condition, intermittent power, or even damage to sensitive electronic components.
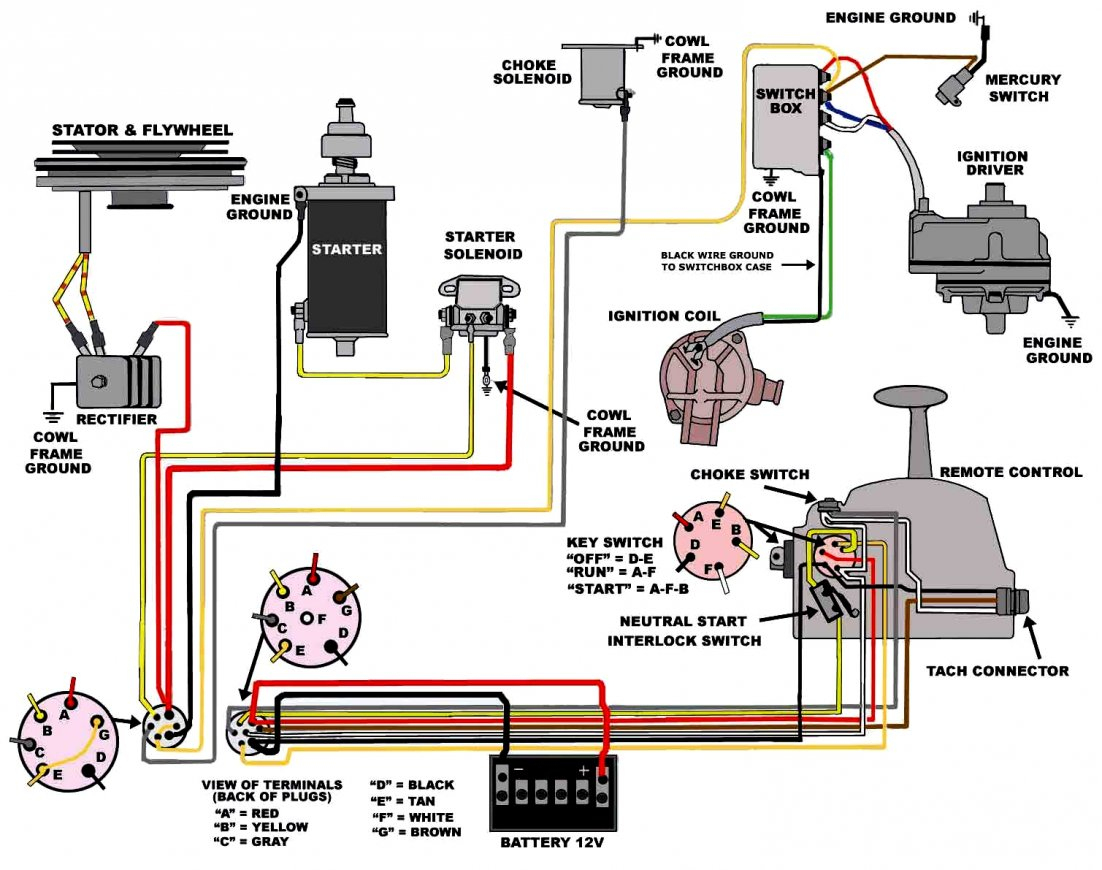
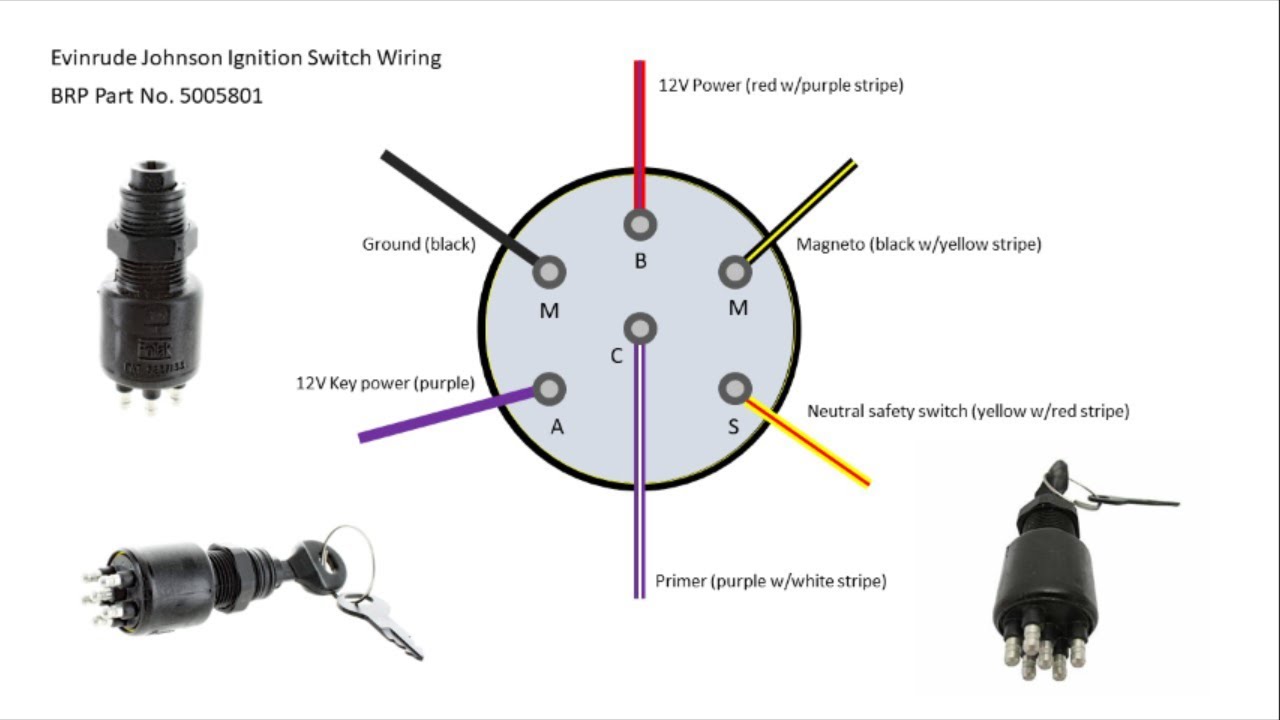
Decoding the Boat Ignition Switch Wiring Diagram
A boat ignition switch wiring diagram is your roadmap to understanding how the switch interacts with the electrical system. These diagrams typically use standardized symbols and color-coded wires to represent the different circuits and connections. Understanding these symbols is essential for accurate troubleshooting and installation.
Here’s a breakdown of common components and their corresponding symbols:
- Battery (+12V): Often represented by a “+” symbol or a battery icon.
- Ground (Negative): Represented by a “-” symbol or a grounding symbol (three horizontal lines).
- Ignition Switch: Depicted as a box with different terminals labeled (e.g., IGN, START, ACC, BATT).
- Starter Motor: A small motor symbol, sometimes labeled “S” or “START.”
- Ignition Coil: A coil symbol, often labeled “IGN.”
- Fuel Pump: A pump symbol, often labeled “FP.”
- Fuses: Small rectangles with a fuse symbol inside, protecting circuits from overcurrent.
- Wires: Lines connecting the components, with color codes usually indicated.
Key Terminals on the Ignition Switch:
- BATT (Battery): Receives power directly from the battery.
- ACC (Accessory): Powers accessories like radios, lights, and gauges when the key is in the “ACC” position.
- IGN (Ignition): Powers the ignition coil, fuel pump, and other engine-related components when the key is in the “ON” position.
- START: Provides power to the starter motor when the key is in the “START” position.
Common Boat Ignition Switch Wiring Configurations
Wiring configurations vary depending on the boat’s age, engine type, and electrical system complexity. However, some common configurations exist:
- Simple Outboard Engines: These systems often have a straightforward setup with a few wires connecting the ignition switch to the battery, starter, ignition coil, and kill switch.
- Inboard Engines: Inboard systems are generally more complex due to additional components like fuel pumps, gauges, and potentially electronic control units (ECUs).
- Modern Engines with Electronic Fuel Injection (EFI) or Electronic Control Modules (ECMs): These systems require more complex wiring to accommodate the electronic components, sensors, and control modules.
Finding the Right Wiring Diagram:
- Boat’s Owner’s Manual: The most reliable source for your specific boat’s wiring diagram.
- Engine Manufacturer’s Manual: Provides diagrams specific to the engine.
- Online Resources: Websites and forums dedicated to boating often have wiring diagrams for various boat models.
- Professional Marine Technician: If you are unsure about the wiring, consult a qualified marine technician.
Troubleshooting Ignition Switch Problems
If your boat won’t start, the ignition switch is a likely suspect. Here’s a systematic approach to troubleshooting:
- Check the Battery: Ensure the battery is fully charged and has a good connection.
- Inspect Fuses: Look for blown fuses, especially those related to the ignition system, starter motor, and accessories.
- Test the Ignition Switch:
- Use a Multimeter: Set the multimeter to measure voltage.
- Test for Power at the Switch: Check for 12V at the BATT terminal.
- Test for Power at the ACC Terminal: Check for 12V when the key is in the “ACC” position.
- Test for Power at the IGN Terminal: Check for 12V when the key is in the “ON” position.
- Test for Power at the START Terminal: Check for 12V when the key is in the “START” position.
- Check Connections: Inspect all wire connections for corrosion, looseness, or damage.
- Check the Starter Relay (if equipped): A faulty starter relay can prevent the starter motor from engaging.
Installing a New Boat Ignition Switch
Replacing a faulty ignition switch is a manageable task for DIY enthusiasts, but requires careful attention to detail.
Steps for Installation:
- Disconnect the Battery: Disconnect the negative (-) battery terminal to prevent short circuits.
- Locate the Old Switch: The ignition switch is typically mounted on the dashboard or console.
- Remove the Old Switch: Disconnect the wires from the old switch, carefully noting their positions and colors.
- Consult the Wiring Diagram: Use the wiring diagram for your boat and the new switch to identify the correct terminals.
- Connect the Wires: Connect the wires to the appropriate terminals on the new switch, ensuring secure connections. Double-check your work!
- Mount the New Switch: Secure the new switch in its mounting location.
- Reconnect the Battery: Reconnect the negative (-) battery terminal.
- Test the System: Turn the key to the “ACC” and “ON” positions and test the accessories. Then, try starting the engine.
- If the engine doesn’t start: Recheck your wiring and connections. Consult a marine technician if needed.
Conclusion
Understanding and correctly wiring your boat’s ignition switch is crucial for safe and reliable boating. By using the correct wiring diagram, troubleshooting systematically, and carefully following installation procedures, you can ensure your engine starts every time and enjoy a worry-free experience on the water. Remember to always prioritize safety and consult a qualified marine technician if you are unsure about any aspect of the wiring.
Frequently Asked Questions (FAQs)
Q: What are the common symptoms of a bad boat ignition switch?
- A: Common symptoms include: the engine not starting, intermittent starting, accessories not working, or the engine stalling unexpectedly.
Q: Can I use a standard automotive ignition switch on my boat?
- A: While some similarities exist, marine-grade ignition switches are specifically designed to withstand the harsh marine environment. It’s best to use a marine-rated switch.
Q: What tools do I need to troubleshoot and replace a boat ignition switch?
- A: You’ll need a multimeter, wire strippers, crimping tool, screwdrivers, and potentially a soldering iron. A wiring diagram and the boat’s owner’s manual are also essential.
Q: How do I prevent corrosion in my boat’s electrical system?
- A: Use marine-grade wiring, connectors, and terminals. Apply dielectric grease to connections to prevent moisture intrusion. Regular inspections and maintenance are also crucial.
Q: Where can I find a wiring diagram for my boat?
- A: Check your boat’s owner’s manual, the engine manufacturer’s manual, or online resources dedicated to boating. If you’re having trouble, a marine technician can often provide the correct diagram.
