

Manual Star Delta Starter Circuit: The Wiring Guide Electricians Swear By
The manual star delta starter circuit is a tried-and-true method for reducing the inrush current when starting three-phase induction motors. This technique is especially crucial for larger motors, preventing voltage dips and potential damage to the motor and the power supply. Electricians worldwide rely on this circuit for its simplicity, reliability, and cost-effectiveness. This article serves as a comprehensive wiring guide, detailing the key components, the wiring process, and best practices to ensure a safe and effective installation.
Understanding the Importance of Soft Starting
Large three-phase induction motors, when started directly online (DOL), draw a significant current – often 5 to 7 times their rated current. This surge, known as inrush current, can cause several problems:
- Voltage Dips: The high inrush current can cause a significant voltage drop in the power supply, potentially affecting other equipment connected to the same line.
- Mechanical Stress: The sudden torque associated with DOL starting can put considerable stress on the motor’s windings and mechanical components, shortening its lifespan.
- Power Supply Issues: In extreme cases, the inrush current can overload the power supply, tripping circuit breakers or even damaging the supply infrastructure.
The manual star delta starter mitigates these issues by reducing the initial voltage applied to the motor during startup, thereby minimizing the inrush current.
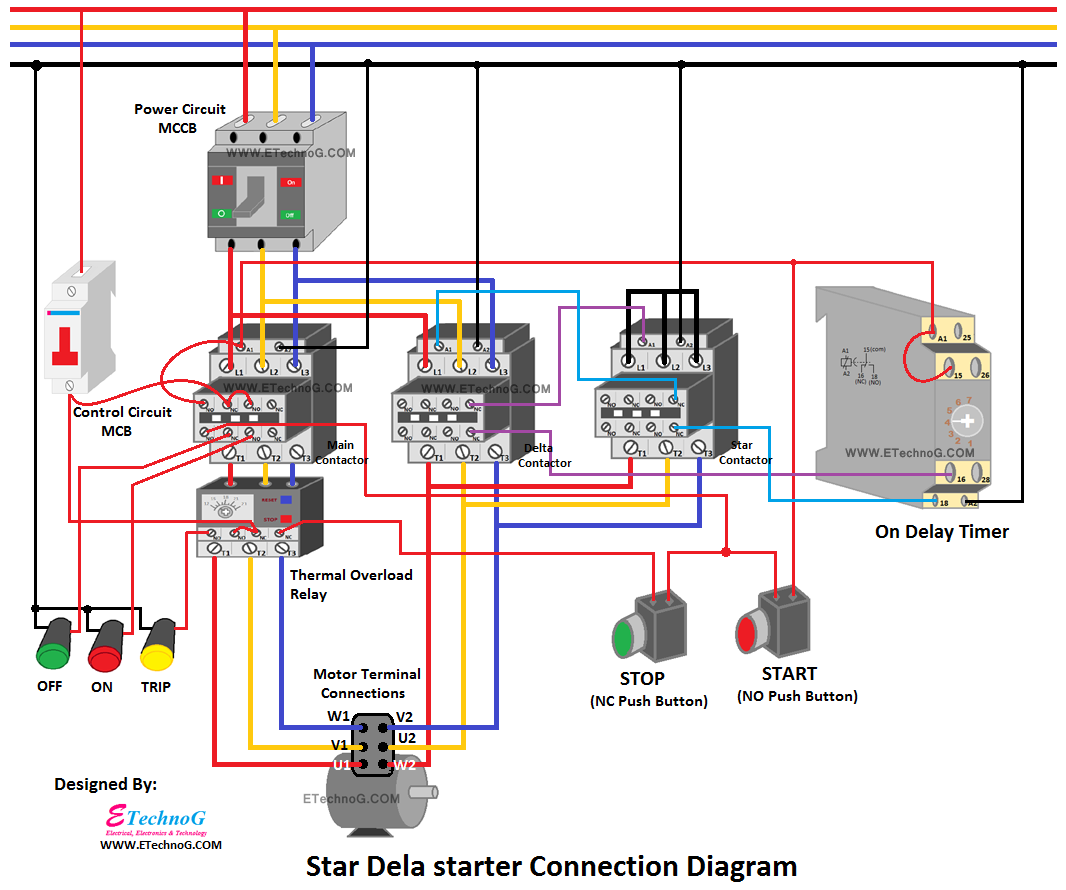
Key Components of a Manual Star Delta Starter Circuit
Before diving into the wiring, let’s identify the essential components:
- Three-Phase Motor: The motor that needs to be started. The motor’s terminal box will have six terminals (T1, T2, T3, T4, T5, and T6).
- Star Delta Starter Switch: This is the heart of the circuit. It’s a manual switch with three positions: Off, Star, and Delta.
- Overload Relay: This protects the motor from overcurrent and overheating during operation.
- Fuses or Circuit Breakers: These protect the circuit from short circuits and overloads.
- Wiring Cables: Appropriate gauge wires are used to connect all the components. Cable size is determined based on motor current and local electrical codes.
- Enclosure (Optional): A protective enclosure to house the components and protect them from the environment.
Wiring a Manual Star Delta Starter Circuit: A Step-by-Step Guide
The following steps outline the wiring process. Always disconnect the power supply before working on any electrical circuit. Consult local electrical codes and safety regulations before proceeding.
- Power Supply Connection: Connect the three-phase power supply (L1, L2, L3) to the input terminals of the circuit breaker or fuses.
- Circuit Breaker/Fuse to Starter: From the output terminals of the circuit breaker/fuses, run wires to the input terminals of the star delta starter switch. These terminals are typically labelled L1, L2, and L3.
- Star Connection Wiring:
- T4, T5, T6: Connect these motor terminals together. This forms the star connection.
- T1, T2, T3: Connect these motor terminals to the output terminals of the star delta starter switch during the star position.
- Delta Connection Wiring:
- T1 & T6: Connect these to the output terminals of the star delta starter switch during the delta position.
- T2 & T4: Connect these to the output terminals of the star delta starter switch during the delta position.
- T3 & T5: Connect these to the output terminals of the star delta starter switch during the delta position.
- Overload Relay Wiring: Install the overload relay in series with the motor leads (usually after the star delta switch output). The overload relay protects the motor from overload conditions during delta operation.
- Earthing/Grounding: Properly earth/ground all metallic components, including the motor frame and the enclosure. This is a crucial safety measure.
- Testing: After completing the wiring, carefully inspect all connections to ensure they are secure and correct. Then, with the power supply connected, test the circuit:
- Start the motor in the Star position. The motor should start smoothly with reduced current.
- After a short time (typically 5-10 seconds, or as specified by the motor manufacturer), switch to the Delta position. The motor should then run at its full speed and power.
- Monitor the motor current during both start and run to confirm that it is within acceptable limits.
Best Practices and Safety Considerations
- Wire Gauge: Use the correct wire gauge based on the motor’s full load current and the length of the wiring run. Consult local electrical codes for specific requirements.
- Terminal Tightening: Ensure all terminal connections are securely tightened to prevent loose connections and potential arcing.
- Grounding: Proper grounding is essential for safety. Verify the grounding connections are secure and effective.
- Overload Relay Setting: Set the overload relay to the correct value, typically based on the motor’s full load current rating.
- Switch Timing: Adhere to the recommended time delay between the Star and Delta positions to prevent any issues.
- Labeling: Clearly label all wires and components for easy identification and future maintenance.
- Protective Gear: Always wear appropriate personal protective equipment (PPE), including safety glasses and gloves, when working with electrical circuits.
Troubleshooting Common Problems
- Motor Doesn’t Start: Check for power supply issues, blown fuses/circuit breakers, faulty switch, or loose connections.
- Motor Overloads: Verify the overload relay setting, check for mechanical issues with the motor, and inspect the wiring for shorts or overloads.
- Motor Runs Slow: Check the power supply voltage, the wiring connections, and the delta connection for proper configuration.
- Motor Runs in Reverse: This is usually caused by incorrect wiring. Check the connections at the motor terminals and the star delta switch.
Frequently Asked Questions (FAQs)
- How long should the motor run in the Star position before switching to Delta? The duration depends on the motor’s size and characteristics. Generally, it’s between 5-10 seconds, but always refer to the motor manufacturer’s recommendations.
- Is a manual star delta starter suitable for all motors? No, it’s primarily suitable for three-phase induction motors that can be wired for both star and delta connections. The motor’s nameplate will indicate this.
- What are the advantages of a star delta starter? The main advantages are reduced inrush current, lower starting torque, and cost-effectiveness compared to other starting methods.
- What are the disadvantages of a star delta starter? The reduced starting torque can be a disadvantage for loads that require high starting torque. Also, the changeover from star to delta can cause a momentary voltage dip.
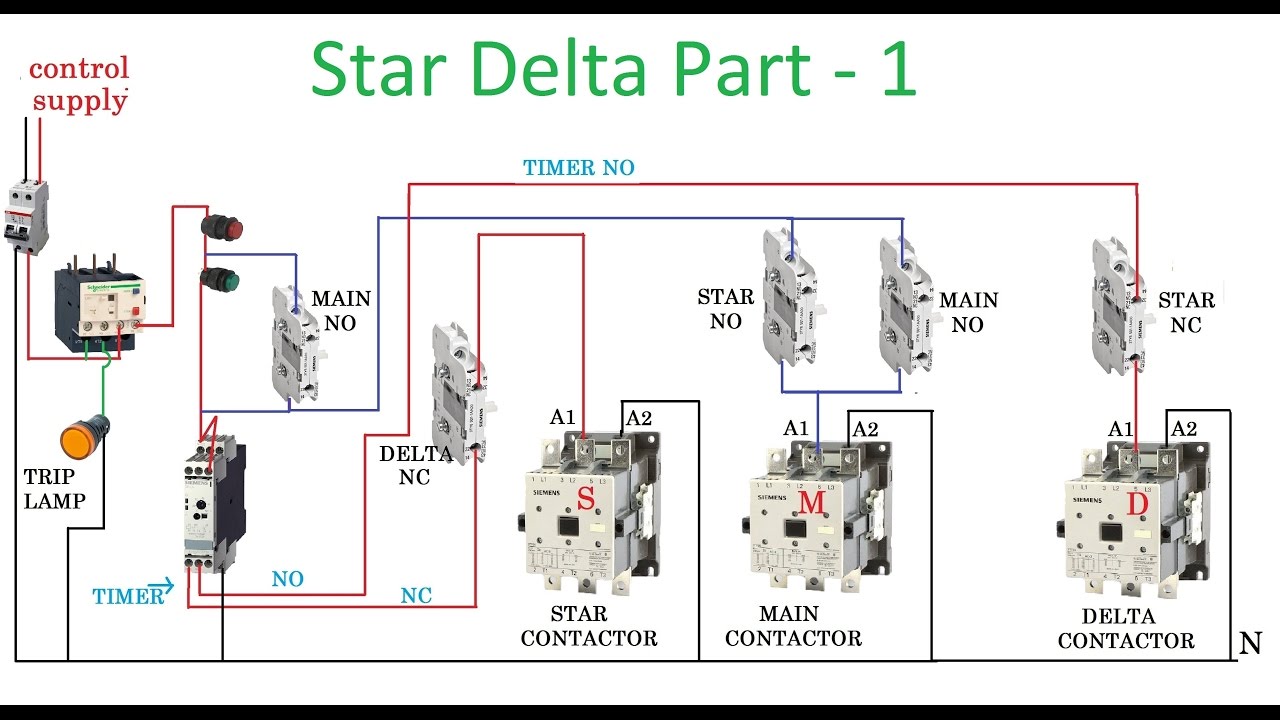
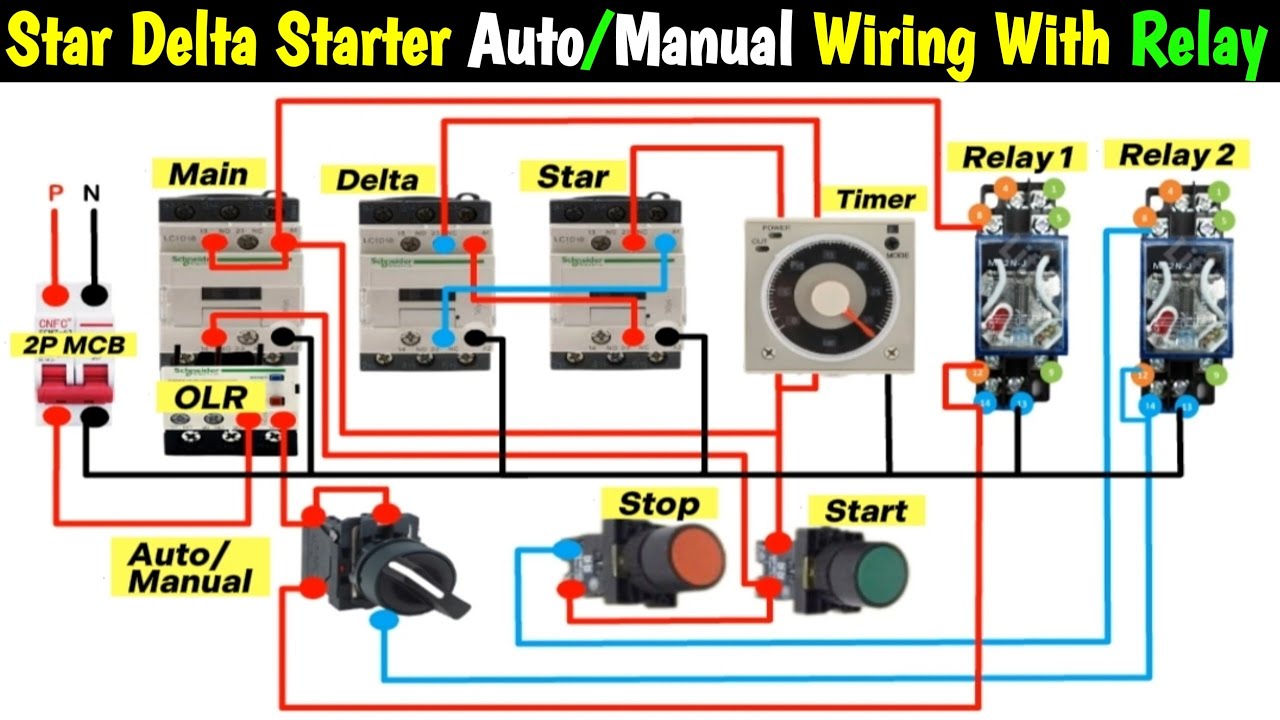
- Can I use a timer to automate the Star-Delta transition? Yes, you can. There are timer relays available that can automatically switch the motor from star to delta after a pre-set time. This makes the process more hands-free.
Conclusion
The manual star delta starter circuit remains a reliable and cost-effective solution for soft starting three-phase induction motors. By understanding the components, following the wiring guide, and adhering to safety best practices, electricians can successfully install and maintain this essential circuit. This guide provides a solid foundation for anyone looking to work with this widely used starting method, ensuring safe and efficient motor operation. Remember to always prioritize safety and consult with local electrical codes and regulations.
