

Coil Split: Seymour Duncan Wiring the Pro Setup – Unlocking Hidden Tones
Tired of your humbuckers sounding like a one-trick pony? Want more versatility from your guitar? Coil splitting is the key to unlocking a whole new world of tonal possibilities, and with the right wiring, you can achieve professional-grade results. This article dives deep into the art and science of coil splitting, focusing on the expertise of Seymour Duncan, and providing you with the knowledge to transform your guitar’s sound. We’ll explore the “pro setup” – the techniques and wiring configurations that deliver the most effective and usable coil-split tones.
What is Coil Splitting and Why Do You Need It?
Coil splitting allows you to effectively “turn off” one coil of a humbucker pickup, leaving the other coil active. This transforms your powerful humbucker into a single-coil pickup, offering a bright, articulate, and often thinner tone reminiscent of Stratocasters or Telecasters.
Here’s why coil splitting is a game-changer:
- Increased Versatility: Go from thick, saturated humbucker tones for rock and metal to crisp, clear single-coil sounds for blues, country, or clean passages.
- Expanded Sonic Palette: Access a wider range of tones, allowing you to cover more musical ground with a single guitar.
- Improved Clarity: Single-coil mode often offers enhanced note separation and articulation, particularly useful for complex chord voicings.
- Cost-Effective Tone Enhancement: Instead of buying multiple guitars, you can achieve a broader tonal spectrum with a simple wiring modification.
Understanding the Anatomy of a Seymour Duncan Humbucker
Before diving into the wiring, it’s crucial to understand the components of a Seymour Duncan humbucker:
- Two Coils: Humbuckers consist of two individual coils of wire, each with its own set of magnets.
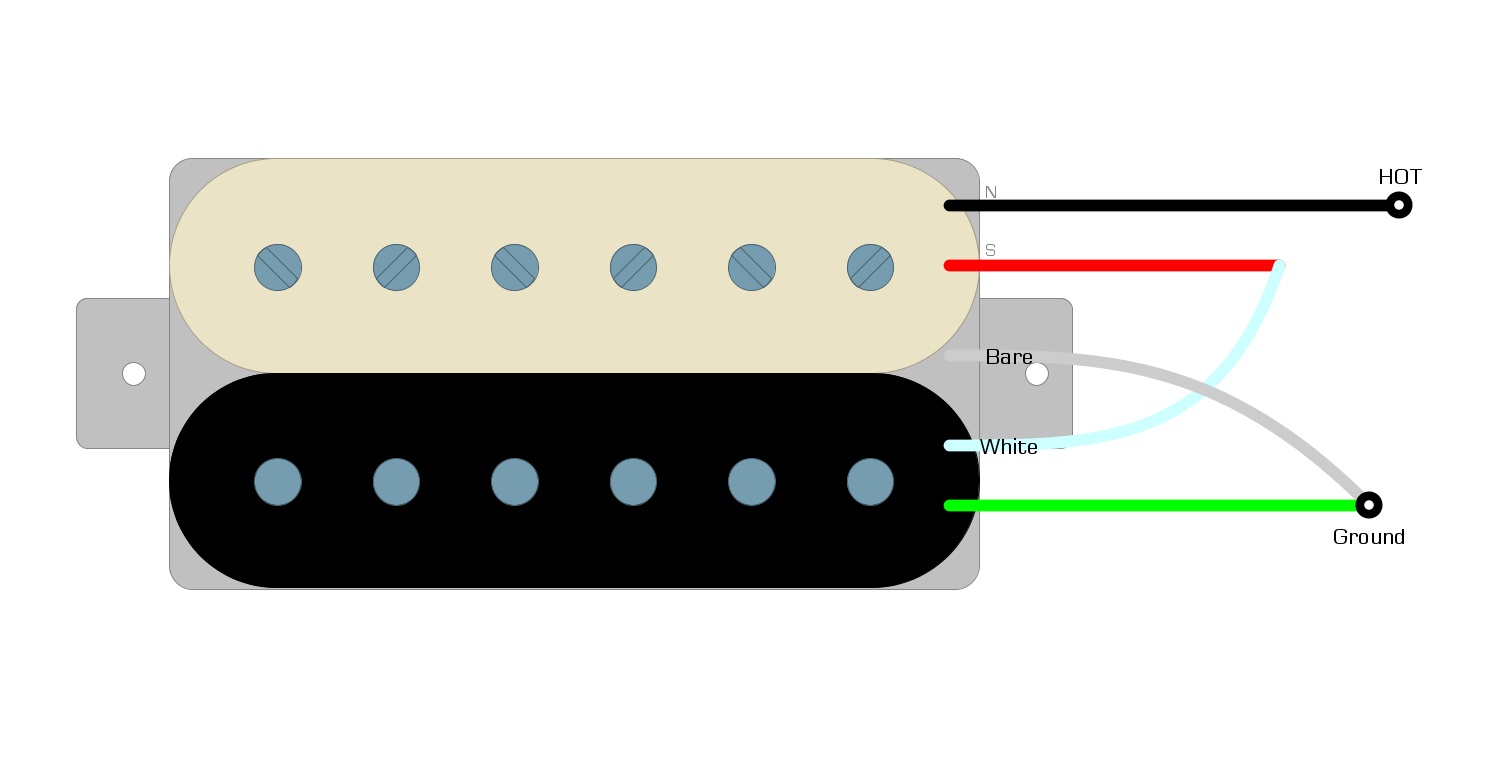
- Four-Conductor Wiring (Standard for Coil Splitting): Most modern Seymour Duncan humbuckers come with four-conductor wiring, plus a ground wire. This allows for various wiring options, including coil splitting. The four conductors typically represent:
- Hot (Series Connection): The main output wire.
- Coil 1 Start: The beginning of one coil.
- Coil 1 Finish: The end of one coil.
- Coil 2 Start: The beginning of the second coil.
- Coil 2 Finish: The end of the second coil.
- Ground (Shield): Connected to the guitar’s ground.
The “Pro Setup” – Wiring Configurations for Optimal Coil Splitting
The “pro setup” focuses on wiring configurations that minimize noise and maximize tonal effectiveness. Here are the most common and reliable methods, with a focus on Seymour Duncan’s recommendations:
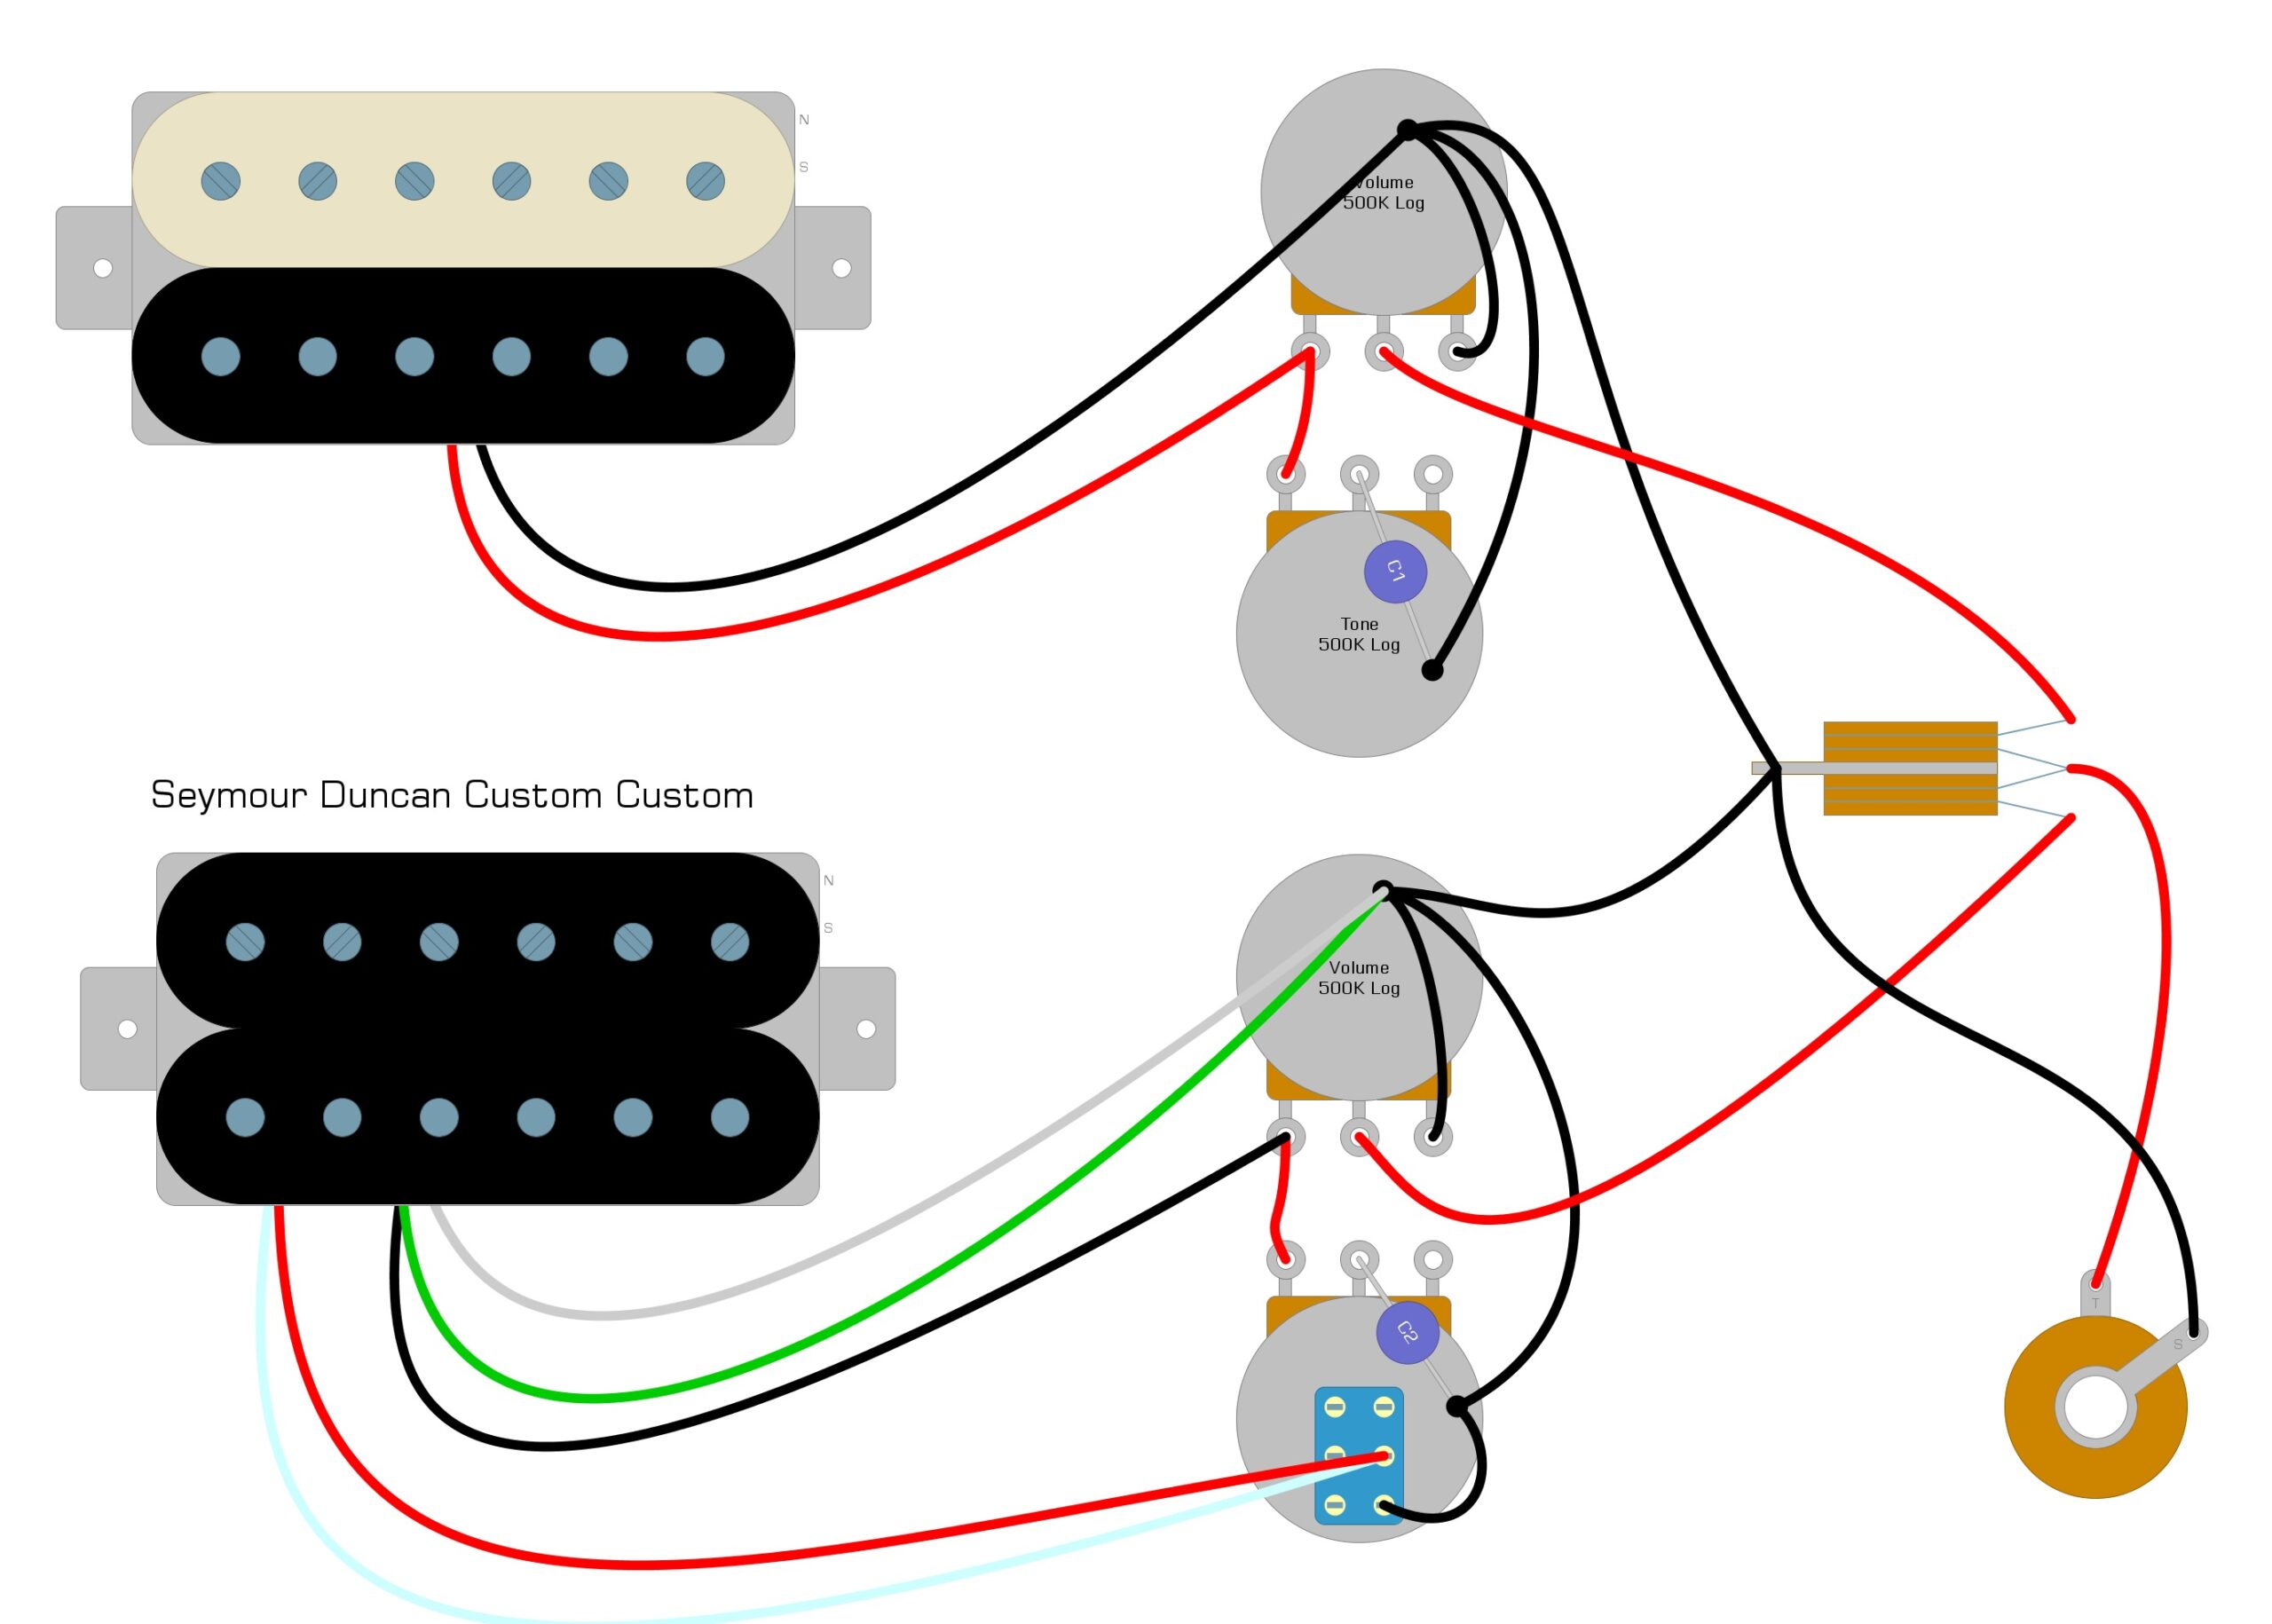
1. Push/Pull Potentiometers: The Standard and Versatile Choice
- How it Works: A push/pull potentiometer replaces one of your tone or volume pots. Pulling the knob activates the coil split, while pushing it in restores the full humbucker sound.
- Seymour Duncan Recommendation: This is the most common and recommended method. It offers a clean and intuitive way to switch between humbucker and single-coil modes.
- Wiring: Connect the appropriate coil wire (typically the “start” and “finish” wires of one coil) to the switch on the push/pull pot. The other coil’s wires are connected normally. When the switch is activated, the coil is shorted to ground, effectively bypassing it.
- Benefits: Easy to use, preserves the original aesthetics of your guitar, and provides a clean signal path.
2. Mini-Toggle Switches: For Dedicated Coil Splitting
- How it Works: A small toggle switch is installed on the guitar’s body, dedicated solely to coil splitting.
- Seymour Duncan Recommendation: A good option if you want a dedicated switch for coil splitting, or if you prefer not to modify your existing pots.
- Wiring: Similar to the push/pull method, the switch connects the chosen coil’s wires to ground, bypassing it.
- Benefits: Provides a clear visual indicator of the coil-split status, allowing quick access to single-coil tones.
3. Series/Parallel/Split Wiring (Advanced)
- How it Works: This more complex wiring allows you to choose between humbucker (series), single-coil (split), and parallel humbucker modes. Parallel mode offers a brighter, less powerful humbucker tone.
- Seymour Duncan Recommendation: Offers the most versatility, but requires more complex wiring.
- Wiring: Requires a multi-pole switch (e.g., a Super Switch) to handle the different connections.
- Benefits: Offers the widest range of tonal options.
Wiring Tips and Best Practices
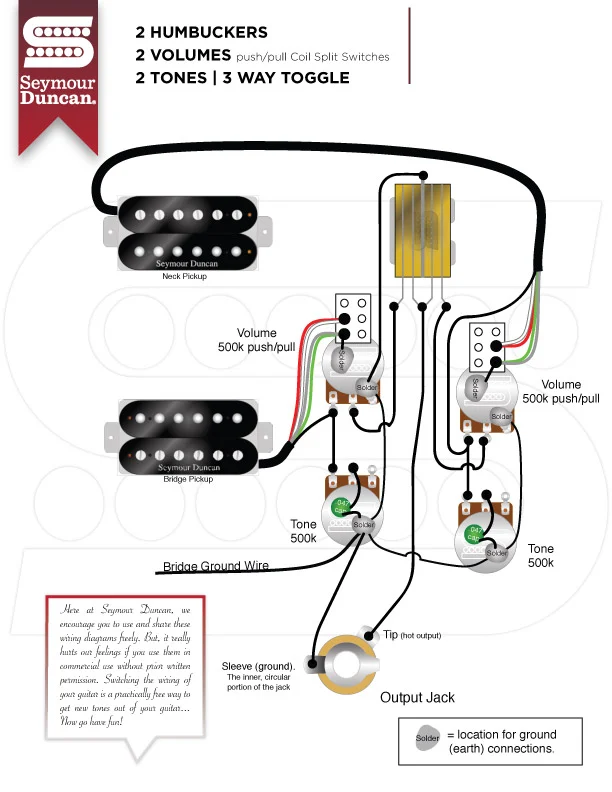
- Consult the Seymour Duncan Wiring Diagrams: Seymour Duncan provides detailed wiring diagrams for all their pickups. Always consult these diagrams for accurate wiring instructions. They are available on their website.
- Use Quality Components: Invest in good quality potentiometers, switches, and wire for optimal signal transfer and reliability.
- Proper Soldering: Use a temperature-controlled soldering iron and practice good soldering techniques to ensure solid connections.
- Shielding: Shielding the control cavity with copper tape can help reduce noise, especially when using single-coil mode.
- Testing: Test your wiring thoroughly after each step to ensure it’s working correctly.
Troubleshooting Common Coil-Splitting Issues
- No Sound in Split Mode: Double-check your wiring, especially the connection to ground. Make sure the coil is being properly shorted.
- Weak or Thin Sound: Ensure you’ve chosen the correct coil to be active in split mode. Experiment with different coil selections to find the sound you prefer.
- Noise Issues: Check your ground connections, and consider shielding your control cavity. Make sure your soldering joints are clean and properly made.
Conclusion: Unleash Your Guitar’s Potential
Coil splitting with Seymour Duncan pickups is a powerful upgrade that significantly expands your tonal palette. By understanding the wiring configurations, using quality components, and following the expert advice of Seymour Duncan, you can unlock a world of new sounds and significantly enhance your playing experience. The “pro setup” methods, like push/pull pots and mini-toggles, provide a reliable and effective way to tap into the versatility of your humbuckers, allowing you to cover a wider range of musical styles and express yourself with greater sonic depth. So, grab your soldering iron, study the diagrams, and get ready to transform your guitar!
Frequently Asked Questions (FAQs)
1. Which coil should I split?
The choice of which coil to split is largely a matter of personal preference. Experiment by splitting different coils and listening to the results. The Seymour Duncan website often provides recommendations based on the pickup model. Often the coil closest to the bridge is split to give a brighter tone.
2. Can I coil split any humbucker?
While most modern humbuckers with four-conductor wiring can be coil split, some older pickups or those with different wiring configurations may not be compatible. Always check the pickup’s specifications before attempting to coil split.
3. Is coil splitting the same as coil tapping?
No. Coil splitting effectively turns off one coil of a humbucker. Coil tapping, on the other hand, allows you to access a portion of the windings on a single coil, providing a lower output and a different tonal character.
4. What if I mess up the wiring?
Don’t panic! Start by carefully reviewing the wiring diagrams. Double-check your connections and try to isolate the problem. If you’re not comfortable troubleshooting, consider taking your guitar to a qualified guitar technician.
5. What tools do I need for coil splitting?
You’ll need a soldering iron, solder, wire strippers, a multimeter (for testing), a screwdriver (for removing the pots), and potentially a drill for installing new switches. A good quality soldering iron with a temperature control is recommended.
